I never thought I’d jump on board the freezer meal prep train, but here we are!
- Freezer Meal Prep vs Frozen Meals
- What You Need For Budget-Friendly Freezer Meals
- How To Prep Meals And Freeze Them
- How to Store Your Easy Freezer Meal Preps
- How to Cook Freezer Meals When You Want aA Quick Dinner
- The Best Vegan And Vegetarian Meals For Easy Freezer Meal Prep
- The Best Easy Freezer Meal Prep Recipes Featuring Meat
- How To Incorporate These Easy Freezer Meal Prep Recipes Into Your Workweek
Instead of cooking fresh meals for dinner each night or relying on regular meal preps or takeout, we just choose a freezer meal components (or the fully cooked meal!) from our stash and 15 to 20 minutes later, dinner is on the table. It’s such a no-brainer, I wonder why I didn’t start this sooner? Thanks to these easy freezer meal prep recipes, we’ve been saving even more time and money while enjoying home cooked meals. This is a great thing to do when you know you’re going to be pressed for time for a couple of weeks and need some help getting a jump start on the prep process.
We’ve got everything you need to make meal prep EASY. Join the Workweek Lunch Meal Prep Program and get our weekly meal plans, meal planning tools, grocery list generator, and more. Start a free trial today!

Freezer Meal Prep vs Frozen Meals
In this post, we’re sharing everything we know about freezer meal prep, which is different than prepping frozen meals. This type of prep involves chopping and preparing ingredients, then freezing everything BEFORE you cook the meal. When you want to eat, you thaw and cook the prepared freezer meal so it’s fresh.
The other way of doing this involves cooking the meal from start to finish, then freezing it and reheating it. That works great, but the benefit of doing the freezer prep method, which we’ll break down below, is that the meal will be fresher, and it’s a lot less work upfront! The only catch is that you need some time to cook the meal when you want to eat (without having to do any chopping). But if the prep is already done, then that’s half the battle. Pop it in the oven while you’re checking email or doing laundry or literally anything else around the house.
Of course, not every meal can be a good freezer meal prep option. I’ve tested a bunch and some were amazing, while some didn’t make this list. Those we save for the traditional meal prep process.
Since starting this method of freezer meal prep, I haven’t meal prepped any dinners. I’ve been spending less time in the kitchen on Sundays, but still enjoying homecooked food all week. I hope you try this method to free up your precious time!
What You Need For Budget-Friendly Freezer Meals
To make a batch of easy freezer meals, you’ll need a few key pieces of equipment!
- Good sharp chef’s knife – here’s our rec
- A cutting board that won’t slip (or pop a damp kitchen towel under it for stability)
- Mixing bowls always make life easier
- A sharpie and freezer tape!
- Or labels for your containers
- Food scale
- A meat thermometer
- These bag clips to hold the bags open
- A magnetic whiteboard for your freezer to keep track of what’s in there
- A deep freezer! If you have space, or a second smaller fridge to put in your garage or basement if you end up getting super serious about this way of meal prepping
- An Instant Pot or Slow Cooker
How To Store Batch Freezer Meal Preps
There are many different ways to go about storing your freezer preps. The main thing to avoid when you’re storing these kinds of meals? You want to eliminate as much air as possible in the storage container, no matter what kind it is, whether it’s a freezer-safe zip-close bag or an actual container.
Air is the enemy of frozen food; it causes freezer burn, which negatively affects the texture of your meals. So no matter which direction you go in, keep this in mind
- Zip-close bags: This is my container of choice, for now. It’s easy to press the air out of them! Make sure to get the freezer-specific ones. The only downside is the plastic waste, but you can reuse them as much as possible.
- 1/2 Gallon Stasher bags: These are reusable but expensive. They’re worth it if you plan on committing to this type of meal prep.
- Round glass containers: These 7-cup containers are ideal for Instant Pot and slow cooking because it’s easier to pop the frozen food right into the pot as it’s already in the right shape. The one downside is that it’s hard to get the air out of a glass container with a traditional lid.
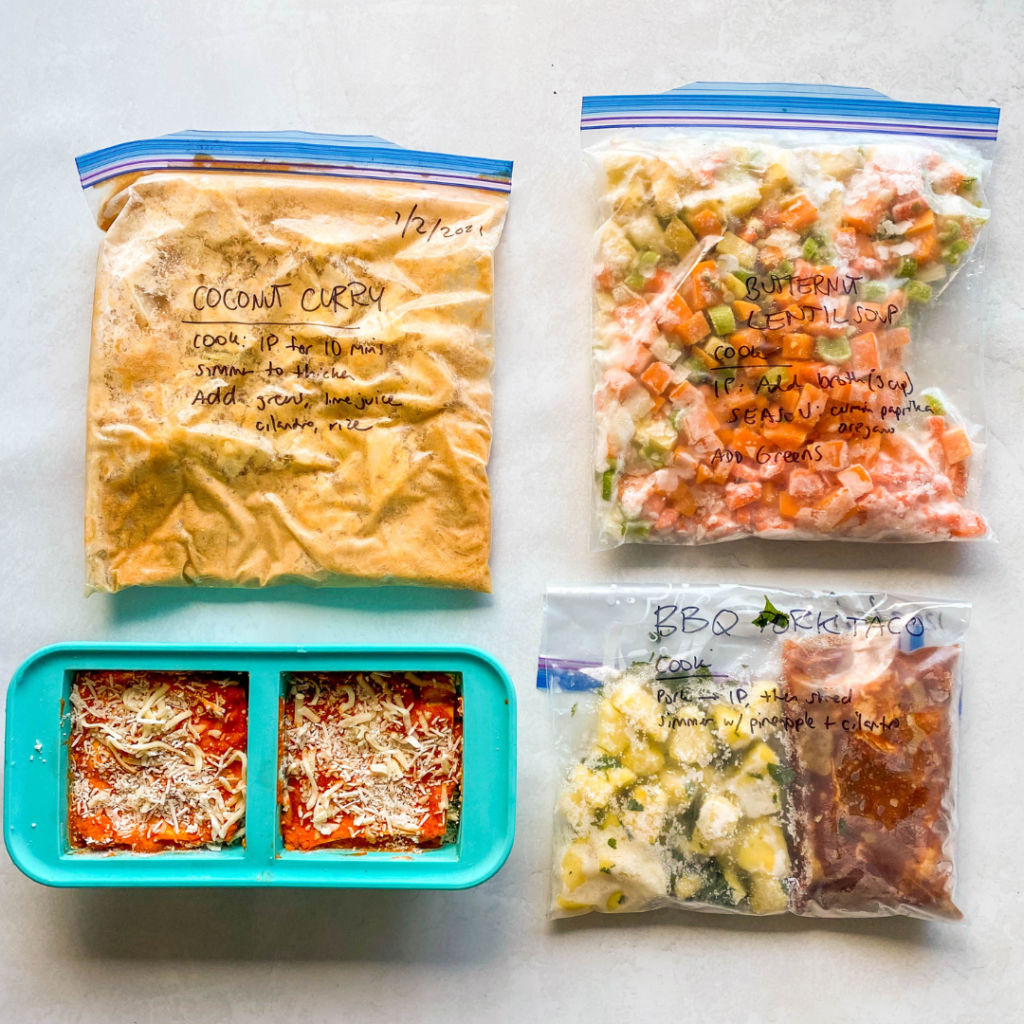
- Souper Cubes: Two-cup Souper Cubes are ideal for oven meals (like our lasagna below!) because you can bake in them. From freezer to oven!
- Vacuum Sealable Containers: These are fancy containers that come with a device that lets you suck the air out of them to avoid freezer burn.
I wasn’t sure I could commit to freezer meal preps (having never tried them before) which is why the zip close bags made the most sense. I may upgrade depending on how far I go with this process. It’s important to try a method out before you invest in equipment.
Related: Minimalist Kitchen Equipment
How To Prep Meals And Freeze Them
Before we dive into recipes, let me walk you through the general method. You can apply this method to so many different recipes, not just easy batch freezer recipes.
- Label your bag or container for your freezer meal prep
- Chop everything you need for the meal you’re prepping
- If there’s a sauce or marinade, mix that up
- Assemble
- Press the air out (if using a bag)
- Freeze flat so it’s easy to store later
- Repeat!
The whole process is very fast. The first time I did this, I prepped 32 meals in 6 hours.
Again, it was my first time so that’s why it went a little slowly. Plus, I cut myself in the process of chopping—don’t be like me! Make sure your knife is sharp! A dull knife will do more damage. It’s counterintutive, but true!

How to Store Your Easy Freezer Meal Preps
Wondering how long freezer meal preps last? You can store these in the freezer for up to 6 months. It really comes down to how well you can press the air out of your bags/containers. The less air in the container, the longer the freezer meal will last.
Related: Our favorite meal prep containers
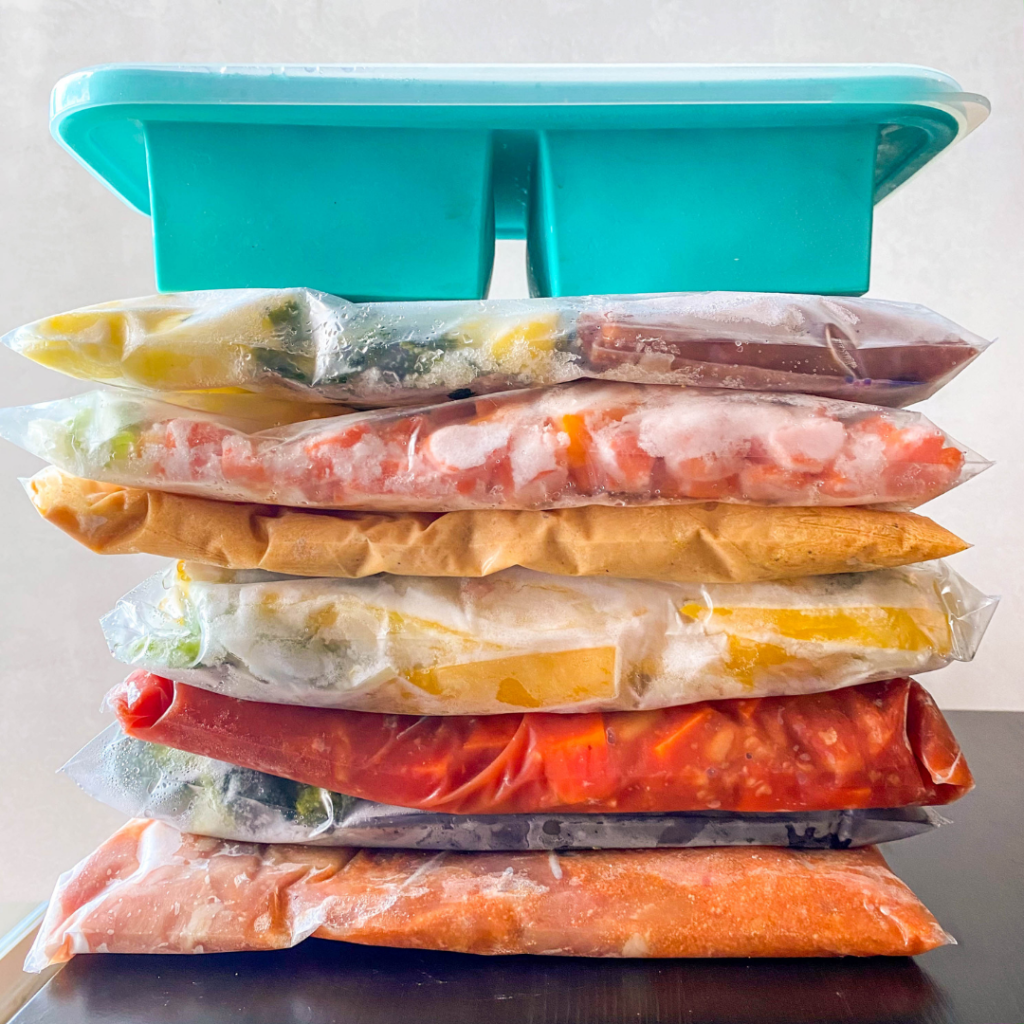
We recommend freezing meals flat so you can easily arrange them in your freezer however they fit best. They don’t take up a ton of room this way either! In our deep freezer, they’re stacked horizontally so we can clearly see the labels as we move them around. You can also buy these little freezer organizers that enable you to stack these bags vertically but, again, don’t go crazy with gear unless you’re sure you’re into this method of prepping as a regular thing.
How to Cook Freezer Meals When You Want aA Quick Dinner
So you’re ready to cook! You have tons of options here, but it really depends on the meal.
Thawing freezer meals
If you’re going the plastic bag route, I recommend thawing freezer meals in the fridge for a few hours. You can always pull it out of the freezer in the morning to thaw during the day while you’re working or out and about. It’s easier, later, it’s easier to fit them in a pot or Instant Pot.
Cooking methods for freezer meal prep
- Instant Pot or Slow Cooker. These methods are best for soup, chili, marinated meat for tacos or fajitas, etc.
- Stove: This is best for steak, shrimp, stir fry meals and meals that need more attention as they cook
- Oven – best for casseroles and sheet pan meals (the broiler is so good for frozen meal preps; any potential extra moisture just evaporates in a hurry!
The Instant Pot is great, but I’ve found that certain meals reheat better on the stove (even if it’s more work) because you have more control over the end result.
Cooking freezer meals in the Instant Pot
For most Instant Pot freezer meals, you can pressure cook for 15-30 minutes, then continue to saute to get any excess water out. You can also use the saute time to add greens, add extra spices or fix the flavors.
The Instant Pot is best for chilis, soups, curries and shredded chicken, pork or beef.

Freezer meals you can cook on the stove
Any meal that you can do in the Instant Pot, you can also cook on the stove. Some meals will require a big pot (soups, chilis, stews) whereas some others you can do in a regular skillet or cast-iron skillet.
Safety Tip: When cooking frozen meat on the stove, it’s important that you thaw it to at least fridge-temp before cooking it on high heat. Otherwise, you run the risk of burning the outside while not fully cooking the inside.
The stove is best for cooking delicate proteins like steak, shrimp, fish, and smaller pieces of chicken for stir-fries. I’d also argue the stove is best for curries because it allows you to build the flavors better, although a low oven works for curries too if your stovetop is otherwise occupied.
How to cook freezer-to-oven meals
Cooking meals from frozen in the oven is super easy! Just double the cooking time you’d normally need. Our lasagnas cooked perfectly from frozen in 60 minutes vs the normal 30 minutes we’d need for baking if we had made it fresh.
What matters most when cooking meals from frozen in the oven is the container. Some glass containers can’t handle going from ice-cold to oven-hot and will shatter. Please make sure your containers are definitely oven-safe. It’s worth taking glass containers out of the freezer an hour before cooking to take the chill off. This will not affect cooking.
Of course, you don’t have this problem with Souper Cubes or the foil baking trays that you can freeze and cook in.
And please, don’t cook anything in plastic containers. That should go without saying… but just in case!
Ok, now you know everything to know about prepping, storing, and cooking these meals. A
re you ready for recipes?
The Best Vegan And Vegetarian Meals For Easy Freezer Meal Prep
These make-ahead freezer meal recipes all yield 4-6 servings and are made to fit in two one-gallon zip-close bags. Feel free to double or half them as needed or desired.
I hope you enjoy them! All but one of them require zero cooking during the prep process.

Freezer Vegetarian Lasagna
*Makes 4 servings
Equipment: a pan, cutting board, a good knife, Souper Cubes, or oven-friendly containers.
Ingredients
- 1 TBSP olive oil
- 8 oz mushrooms, chopped (optional, choose another veg if you’re not a fan)
- Salt and pepper, to taste
- 12 oz spinach, chopped
- No-boil lasagna noodles
- 16 oz ricotta cheese (sub 14 oz tofu “ricotta”)
- 2 cups mozzarella cheese
- 1 cup Parmesan cheese
- 3 cups marinara sauce (I love Rao’s)
Assembly Instructions:
- Add the olive oil to a skillet over medium heat, followed by the mushrooms and salt and pepper to taste. Cook for 10 minutes, until the mushrooms have cooked down and reduced in volume. Turn off the heat and add the spinach to the pan. Stir and cover the pan to let the spinach wilt.
- Break the lasagna noodles so they will fit into your containers. For Souper Cubes, I broke my noodles in half.
- Assemble the lasagna: start with a layer of marinara sauce, followed by a layer of noodles. Top with ricotta cheese, vegetables, mozzarella cheese, and Parmesan cheese. Then add another layer of noodles, followed by marinara, ricotta, the remaining vegetables, mozzarella cheese, and Parmesan. Add the last layer of noodles, then marinara sauce, mozzarella cheese, and Parmesan cheese.
- Seal the container and store it in the freezer!
Cooking Instructions:
If you are using Souper Cubes, foil containers, or glass containers, follow the directions below. If you’re using glass, make sure to take it out of the freezer an hour before you want to cook.
When you’re ready to eat, preheat your oven to 375 F (190 C). Place the container in the oven (uncovered) and bake for 60 minutes, until the lasagna is bubbling. You can use a food thermometer to test the internal temp. It should be over 100 F (40 C). Remove the lasagna from the container and enjoy!

Freezer Vegan Coconut Cauliflower Curry
*Makes 6 servings, 3 meals per bag
Equipment: a measuring glass, knife, and cutting board, plus two gallon-sized containers or bags.
Ingredients
- 2 (15-oz) cans of chickpeas, rinsed and drained
- 2 (15-oz) cans of coconut milk
- 1 head of cauliflower, chopped into florets
- 1 onion, chopped
- 4 cloves garlic, minced (I used a grater to speed this up)
- 2 tablespoons curry powder
- 4 teaspoons turmeric
- 4 teaspoons cumin
- 2 teaspoons paprika
- 1 teaspoon salt
- Spinach, optional for serving
- Rice for serving
- Naan for serving
Assembly:
- Label your container or bag!
- Add all the ingredients to a big bowl and mix!
- Divide the mixture between two gallon-sized bags. Lay the bags flat to get the air out of them. Seal and freeze!
Cooking Instructions:
Make sure to thaw this meal a bit before cooking so it’s easier to fit in a pot or Instant Pot.
For the Instant Pot: Add the mixture to the inner pot and pressure cook for 15 minutes. Meanwhile, cook rice or get some naan ready! The cauliflower will break down and make the sauce thicker. When it’s done and you can open the pot, add spinach if using and let it simmer for 5 minutes and adjust seasonings as necessary. Serve with rice and/or naan.
On the Stove: Add the mixture to a large pot or Dutch oven over medium heat. Let it thaw and stir often as it cooks. It will take about 40 minutes total. In the last 10 minutes of cooking, add the spinach if using, taste, and adjust seasonings as necessary. Cook rice and prepare naan while the curry cooks on the stove for serving. Coconut cauliflower curry will last in the fridge for 4-5 days.
Note: This curry will taste different because we’re dumping everything in the pot at once instead of building flavors like normal. It doesn’t really have the depth of flavor a traditional curry would, but it’s still good and easy! And it will still taste good!
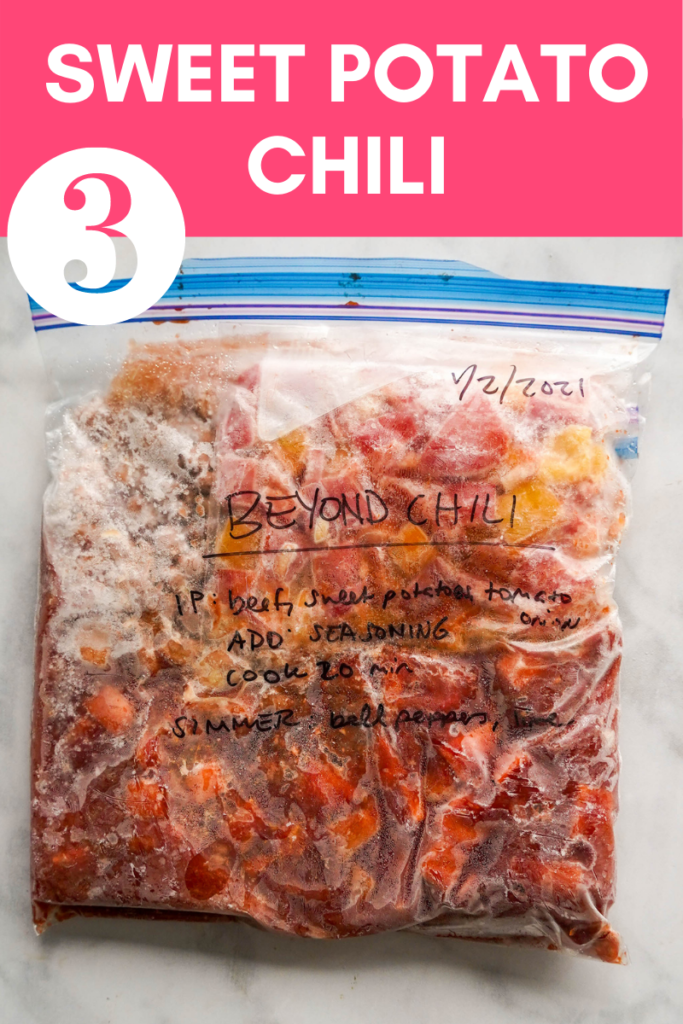
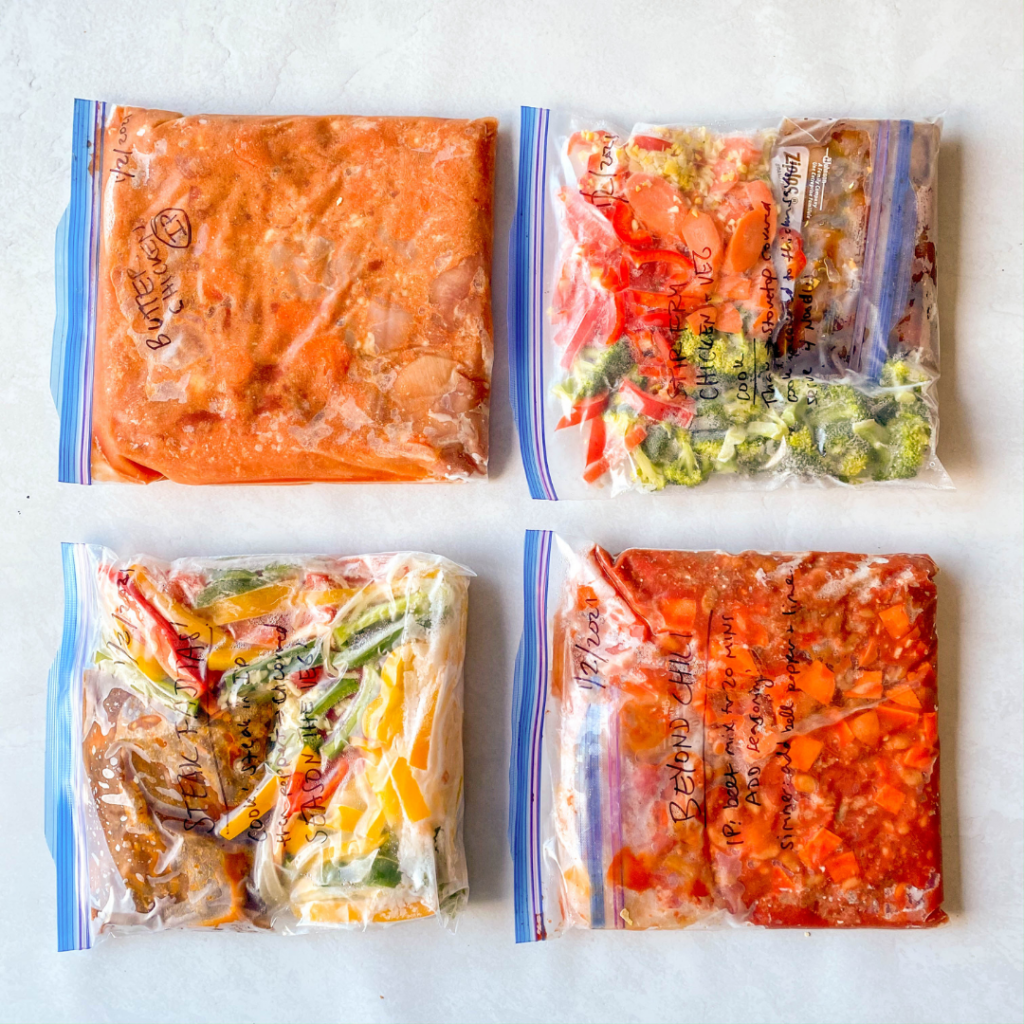
Freezer Vegan Beyond Beef Sweet Potato Chili
*Makes 6 servings, 3 meals per bag
Equipment: a measuring glass, knife, and cutting board, plus two gallon-sized containers or bags.
Ingredients
- 1 (16-oz) package of Beyond Beef (or regular ground beef)
- 2 (15-oz) cans pinto beans, drained and rinsed
- 2 (15-oz) cans diced tomatoes
- 1 (15-oz) can of tomato sauce
- 2 sweet potatoes, chopped
- 1 yellow onion, chopped
- 4 cloves garlic, minced
- 2 red bell peppers, chopped
- 2 teaspoons salt and pepper
- Your favorite chili toppings for serving
Assembly:
- Label your freezer bags/containers!
- Add all the ingredients to your zip-loc bags or containers. Lie them flat so you can press the air out. Then seal and freeze!
Cooking Instructions:
For the Instant Pot: Add the mixture to the inner pot and pressure cook for 20 minutes. The sweet potato will break down and make the sauce thicker. When it’s done and you can open the pot, let it simmer for 10 minutes and adjust seasonings as necessary. Serve with your favorite chili toppings! (Avocado is especially good here.)
On the Stove: Add the mixture to a large pot or Dutch oven over medium heat. Let it thaw and stir often as it cooks. It will take about 50-60 minutes altogether, depending on how frozen it was when you started cooking. In the last 10 minutes of cooking, taste and adjust seasonings as necessary.
Vegan sweet potato chili will last in the fridge for 4-5 days.

Freezer Vegan Red Lentil Tomato Curry
*Makes 6 servings, 3 meals per bag
Equipment: a measuring glass, knife, and cutting board, plus two gallon-sized containers or bags.
Ingredients:
- 1 (15-oz) can tomato sauce
- 2 (15-oz) cans diced tomatoes, drained
- 2 (15-oz)cans coconut milk
- 1 yellow onion, chopped
- 1 head of cauliflower, chopped into florets
- 1 cup of red or brown lentils
- 1 tablespoon curry powder
- 2 teaspoons cumin
- 2 teaspoons garam masala
- 1 teaspoon chili powder
- 1 teaspoon salt
- Spinach, optional for serving
- Rice for serving
- Naan for serving
- lime wedges and cilantro for garnish, optional
Cooking Instructions:
Make sure to thaw this meal a bit before cooking so it’s easier to fit in a pot or Instant Pot.
For the Instant Pot: Add the mixture to the inner pot and pressure cook for 15 minutes. Meanwhile, cook rice or get some naan ready! When it’s done and you can open the pot, add spinach if using and let it simmer for 5 minutes and adjust seasonings as necessary. Serve with rice and/or naan.
On the Stove: Add the mixture to a large pot or Dutch oven over medium heat. Let it thaw and stir often as it cooks. It will take about 40 minutes In the last 10 minutes of cooking, add the spinach if using, taste, and adjust seasonings as necessary. Cook rice and prepare naan while the curry cooks on the stove for serving.
Red Lentil Curry will last in the fridge for 4-5 days.
Note: This curry will taste different because we’re dumping everything in the pot at once instead of building flavors like normal. It doesn’t really have the depth of flavor a traditional curry would, but it’s still good and easy.
The Best Easy Freezer Meal Prep Recipes Featuring Meat
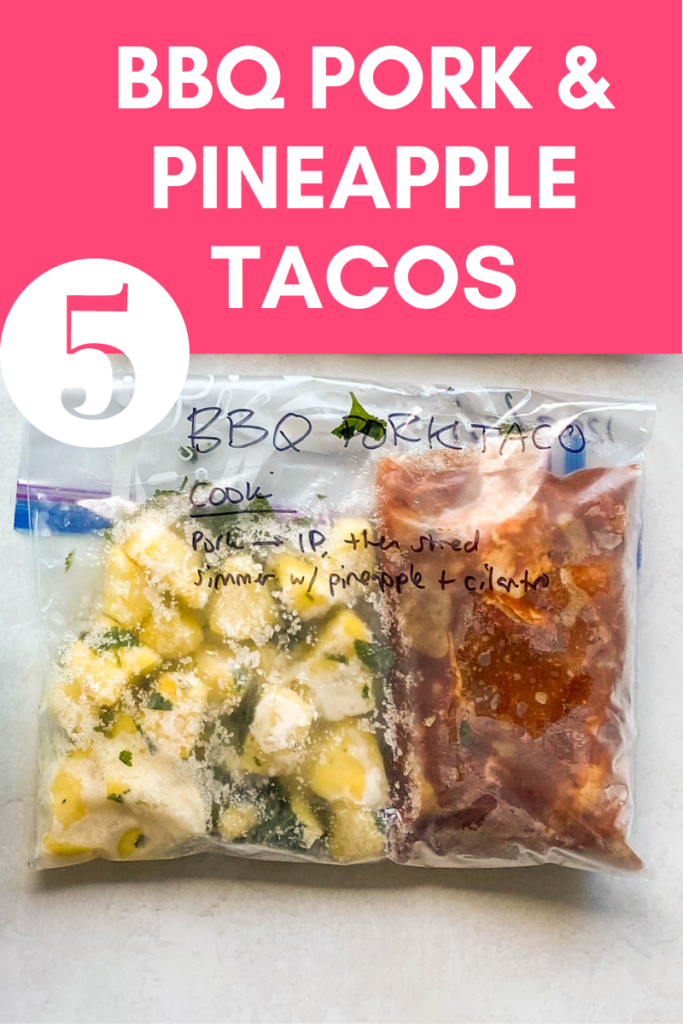
Freezer BBQ Pork And Pineapple Tacos
*Makes 4 servings, 2 meals per bag
Equipment: quarter-gallon zip-close bags for the pork, bigger bags/containers for the whole meal, a measuring glass, knife, and cutting board.
Ingredients
- 2/3 cup ketchup
- 1/2 cup brown sugar (sub) honey
- 1/4 cup soy sauce (sub liquid aminos)
- 1 tablespoon Worcestershire sauce
- 1 navel orange, sliced (for juices, sub grapefruit)
- 1/4 cup sriracha (optional if you like heat)
- 2 tsp paprika
- 1 tsp salt
- 1 tsp pepper
- 3 cloves garlic, minced (I use a grater to speed things up)
- 2 pounds pork shoulder, divided
- 3 cups chopped pineapple, divided
- 1 bunch cilantro, chopped
- Tortillas, avocado, salsa, sour cream, and your favorite taco toppings for serving
Assembly:
- Label your container or bag! (This is much easier to do when they are empty!)
- Mix the ketchup, brown sugar, soy sauce, Worcestershire sauce, orange juice, sriracha, paprika, salt, pepper, and garlic in a measuring glass. Make sure to taste it before you commit!
- Cut the pork in half (this is a good time to use a scale) and add it to two quarter-gallon freezer bags. Pour half the marinade into each bag. Lie the bags flat and press the air out as you close and seal them. Add the pork bags to your bigger bags/containers.
- Divide the chopped pineapple and cilantro between the 2 bigger bags.
- Lie the bags flat to press as much air as possible out. Freeze!
Cooking Instructions:
For the Instant Pot: Add the frozen pork and marinade to the inner pot. Seal the pot and pressure cook for 20 minutes. Remove the pork, shred it with 2 forks, and return it to the pot. Add the frozen pineapple to the pot. Saute for 10 minutes to thicken the liquid in the pot.
For the stove: Add the frozen pork and marinade to a pot or Dutch oven on the stove over medium heat. Cover the pot and let it cook for 40-50 minutes, rotating the pork halfway. Note it will take less time if the pork has been thawed in the fridge. When the pork is fully cooked through, take it out of the pot, shred it with 2 forks, and return it back to the pot. Add the frozen pineapple to the pot. Saute for 10 minutes to thicken the liquid.
Serve with tortillas, avocado, greens, salsa, sour cream, and any other taco toppings you like. Leftover pork will keep in the fridge for 4-5 days.
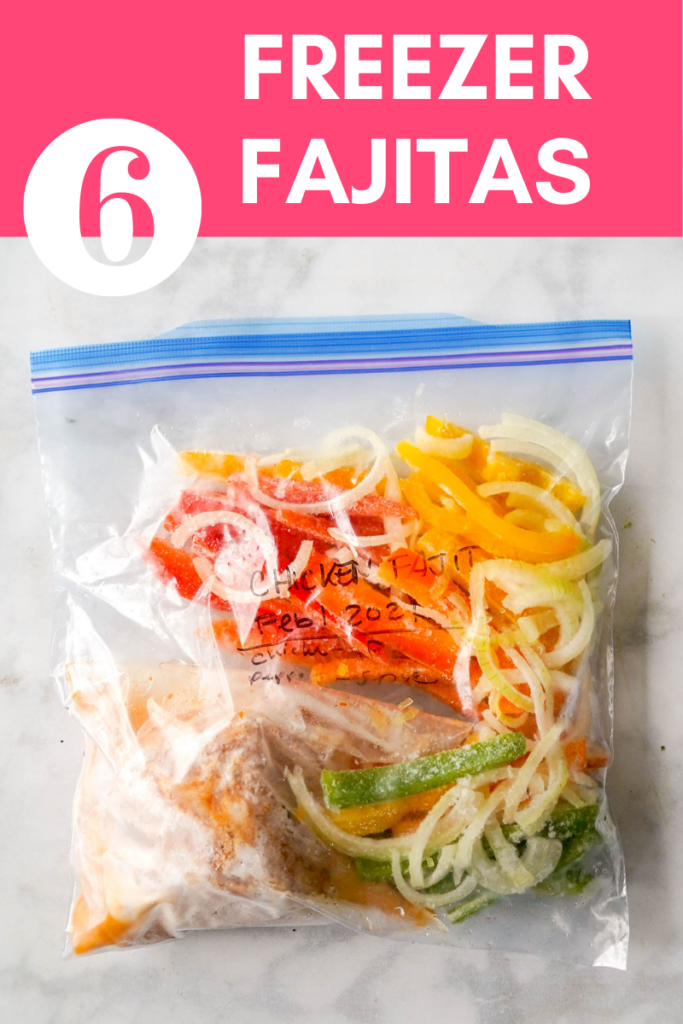
Freezer Steak (or Chicken) Fajitas
*Makes 6 servings, 3 meals per bag
Equipment: a measuring glass, knife, and cutting board, plus two quarter-gallon bags and two gallon-sized containers or bags.
Ingredients
- 2 pounds flank steak, divided
- 3 tablespoons olive oil
- 2 tablespoons Worcestershire sauce
- 1 lime, for juices
- 1 navel orange, for juices
- 2 teaspoons cumin
- 2 teaspoons chili powder
- 1 teaspoon salt
- 1 teaspoon ground pepper
- 2 tablespoons olive oil
- 2 red bell peppers, sliced
- 2 green bell peppers, sliced
- 1 yellow bell pepper, sliced
- 1 orange bell pepper, sliced
- 1 large yellow onion, sliced
- 1 packet of taco seasoning
- Fajita tortillas for serving
- lime wedges for serving
Assembly:
- Label your container or bag!
- Mix the olive oil, Worcestershire sauce, lime juice, orange juice, cumin, chili powder, salt, and ground pepper in a measuring glass.
- Divide the steak between two smaller quarter gallon-sized bags. Pour half of the marinade in each bag. Lay the bags flat to press the air out of them and seal. Be careful not to spill any marinade!
- Add the bell peppers and onion to a big bowl and toss them with the taco seasoning and olive oil. Divide the bell peppers between two large containers. Add the steak bags to each container. Press the air out and seal. Then freeze.
Cooking Instructions:
This meal is best for the stove and oven and works best when you thaw the steak in the fridge first.
- Preheat your oven on the broiler setting.
- Pour the bell peppers onto a sheet pan and spread them out. Season with salt and pepper. Place in the oven on the upper rack and cook for 10-15 minutes, until the peppers are slightly charred. Remove from the oven and set aside.
- Preheat a cast-iron or stainless steel skillet for a few minutes. Add 1 TBSP vegetable oil and let that heat up. Meanwhile, remove your thawed steak from the marinade.
- Add the steak to the pan and cook on each side for 4-5 minutes or until an internal thermometer reads 125 F (50 C). Let the steak rest for 10 minutes when finished cooking. Then slice it up!
Serve fajitas with warm tortillas and lime wedges. Leftovers will keep in the fridge in an airtight container for 3-4 days.
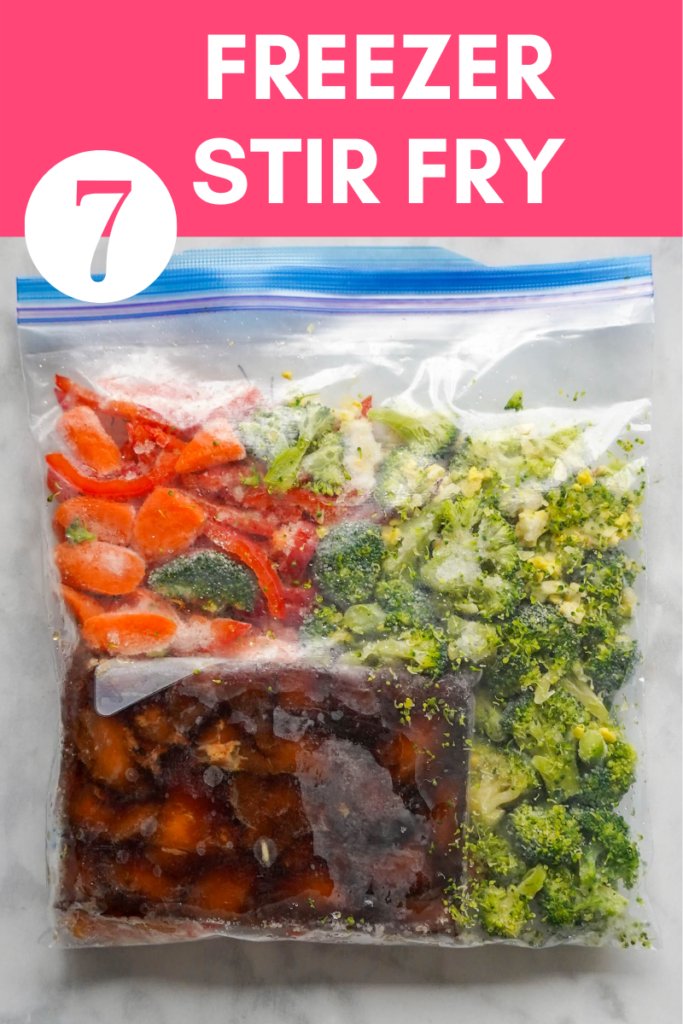
Freezer Chicken And Veggie Stir Fry
*Makes 6 servings, 3 meals per bag
Equipment: a measuring glass, knife, and cutting board, plus two quarter-gallon bags and two gallon-sized containers or bags.
Ingredients
- 2 (16-oz) chicken breasts, chopped
- 1/2 cup soy sauce
- 1/3 cup honey (sub maple syrup or agave)
- 2 cloves garlic, minced
- 2 tablespoons rice vinegar
- 2 teaspoons sesame oil
- 2 heads of broccoli
- 4 carrots, chopped
- 2 red bell pepper, chopped
- 2 tablespoons of olive oil, for cooking
- Rice or noodles for serving
Assembly:
- Label your bags/containers.
- To a measuring glass, add the soy sauce, honey, garlic, rice vinegar, and sesame oil.
- Divide the chicken between two quarter-gallon zip close bags. Then add half of the marinade to each bag. Lay the bags flat and press the air out before sealing. Place the chicken bags in the bigger bags/containers.
- To the bigger bags/containers, add the broccoli, carrots and bell peppers. Lay the bags flat to press as much air out as possible before sealing and freezing.
Cooking Instructions:
This recipe works best when you thaw the chicken out in the fridge/on the counter first.
- Cook rice or noodles for serving and set aside.
- Preheat a non-stick skillet. Add 1 tablespoon of oil and let it warm up for a minute. Then add the chicken from the marinade. Make sure to not overcrowd the chicken or get too much marinade in the pan (you may need to cook it in batches). Cook the chicken for 10-12 minutes, rotating the pieces often. When they’re done, set the chicken aside and return the pan to the stove.
- Add another tablespoon of oil to the skillet, then add the veggies with salt and pepper. Cook over medium-high heat for 6-7 minutes (11-12 if totally frozen), stirring occasionally. When the veggies are done, turn off the heat and add the chicken to the pan to toss everything together.
- Serve with rice or noodles.
Leftovers will last in the fridge for 3-4 days.

Freezer Butter Chicken
*Makes 6 servings, 3 meals per bag
Equipment: a measuring glass, knife, and cutting board, plus two quarter-gallon bags and two gallon-sized containers or bags.
Ingredients for the marinade:
- 1 cup plain yogurt
- 4 cloves garlic, minced
- 2 teaspoons garam masala
- 1 teaspoon cumin
- 1 teaspoon chili powder
- 1 teaspoon turmeric
- 1 teaspoon salt
- 2 (16-oz) packages boneless chicken thighs, chopped
For the rest:
- 1 yellow onion, chopped
- 2 (15-oz) cans of tomato sauce
- 2 teaspoons cumin
- 2 teaspoons garam masala
- 1 teaspoon chili powder
- 1 teaspoon salt
- 1 tablespoon of olive oil for cooking
- 2 cups of heavy cream, milk of your choice or coconut milk for serving
- rice or naan for serving
- cilantro and lime wedges for serving
Assembly:
- Label your bags/containers!
- Mix everything for the marinade except the chicken in a measuring glass. Divide the chicken between two quarter-gallon zip close bags. Add half of the marinade to each bag. Lay the bags flat to press the air out, then seal and set aside.
- Add the remaining ingredients to the larger gallon bags. Place the chicken in the bags. Lie the bags flat to press the air out, then seal and freeze!
Cooking Instructions:
This meal works best on the stove. Thaw the chicken out for a bit before cooking for best results.
- Preheat a non-stick skillet over medium heat. Add the olive oil, followed by the marinated chicken. Cook the chicken for 10-12 minutes over medium heat, rotating the pieces often.
- When the chicken is cooked, add in the remaining ingredients and simmer for 15 minutes. Meanwhile, prepare the rice and/or naan.
- Turn the heat off and stir in the heavy cream/milk/coconut milk. Taste and adjust seasonings as necessary.
- Serve with rice, naan, cilantro, and lime wedges if desired.
Leftover butter chicken can last in the fridge for 3-4 days.
How To Incorporate These Easy Freezer Meal Prep Recipes Into Your Workweek
Like I mentioned earlier, my partner and I use these freezer meal prep recipes during the week on weeknights, or on weekends when the other options require too much work.
I try to prep a few every weekend to keep our stash of freezer meals going! In addition to the meals above, I’ve tried beef and broccoli, butternut squash soup, and more.
I hope these batch-cooking recipes for freezing help make your life a little bit easier! You can easily prep a few of these on a weekend and have freezer meals for a month to enjoy.
If you like posts like this and want to hear more from Workweek Lunch, sign up to get weekly emails from us with practical meal prep tips without any diet culture BS.
This post contains affiliate links to allow Workweek Lunch to earn a commission on purchases and continue running this blog!


Kate says
Can we add these to our weekly meal plan in the meal planning tool? I’d love to see more freezer prep meals in the future!
Talia Koren says
We will eventually be adding these to the WWL Program once we can get multiple versions tested!
Tammi Blackstone says
Ah! I’ve been searching for this on the new wwlprogram website and couldn’t find it. (But heard you talking about it a lot on Instagram.) Are both websites staying active? I thought wwlprogram was replacing this one.
Talia Koren says
It’s going to take a bit longer for us to get these in the Program with multiple versions to test (and the fact that they’re freezer recipes)!