For an updated tutorial on how to use the Workweek Lunch Meal Planning Program on Desktop, CLICK HERE
Searching Recipes / Recipe Discovery
You can search by ingredient, category and recipe title.
Tap the search bar where it says “touch to search recipes” and a panel with our search options will pop up.
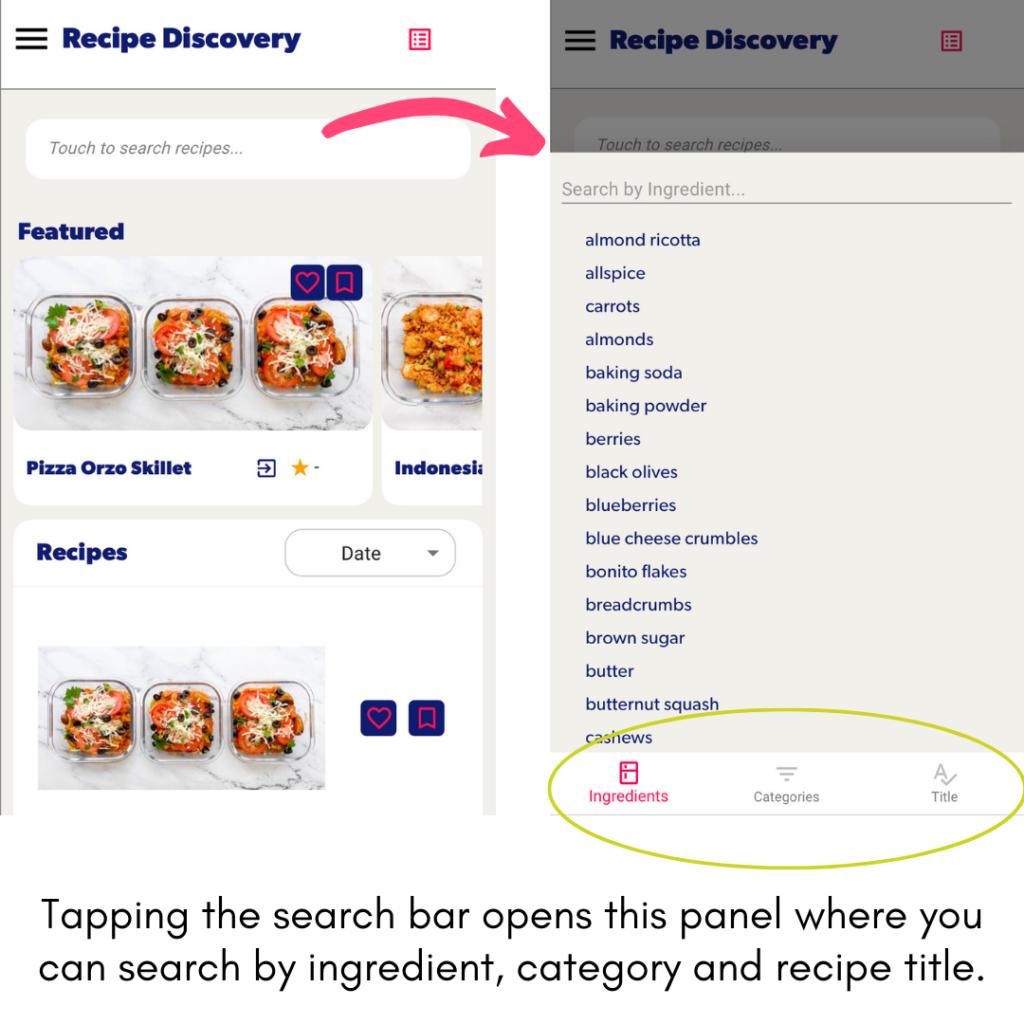
Note that you can only search ingredients in our database.
If you can search an ingredient, but nothing comes up, it means that we don’t have a recipe that matches that ingredient (even though it’s in our database) and we may be working on one!
You can now search multiple ingredients at once too!
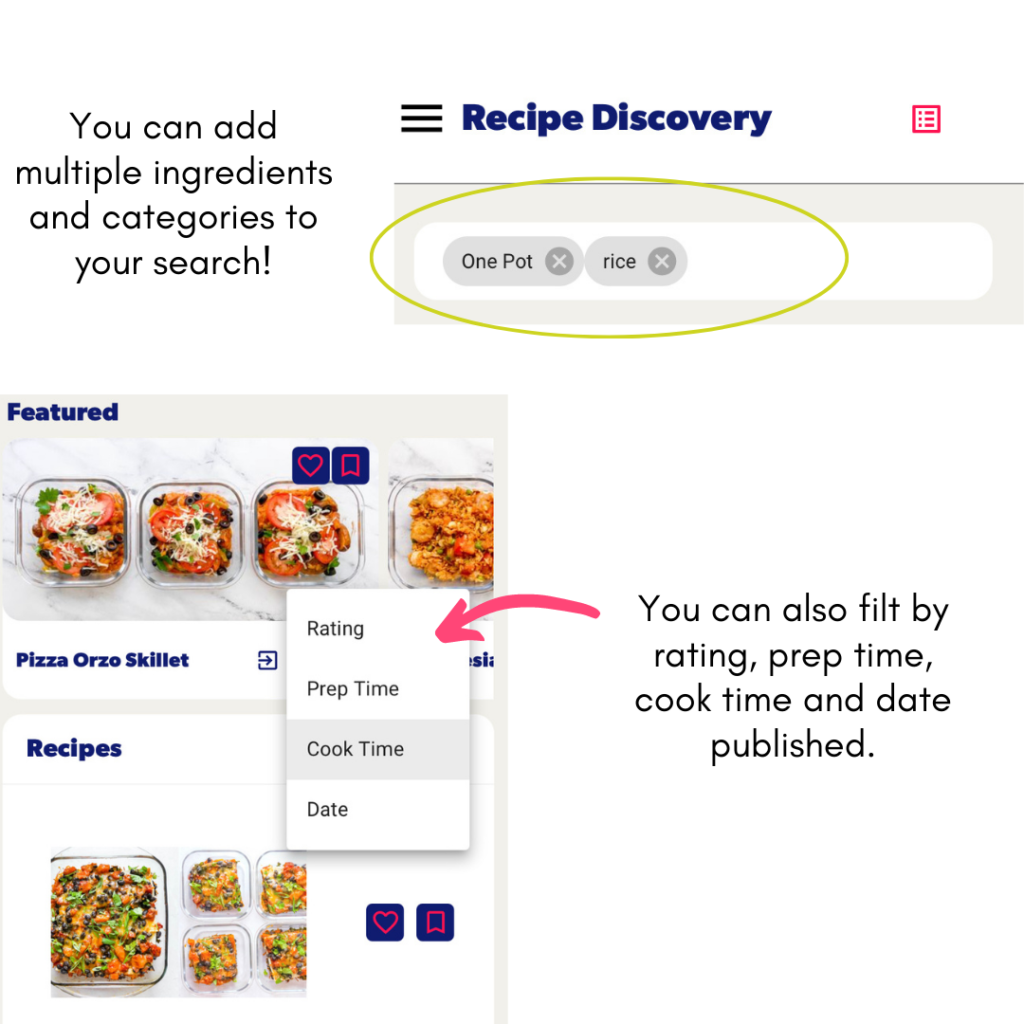
You can sort search results by rating, date published, cook time and prep time.
This makes it easier to refine your search results.
How To Use All The New Recipe Features

All recipes can be made vegan, vegetarian and omnivore, as well as gluten-free and dairy-free.
If you select “vegetarian” and “dairy-free” it will automatically set to “vegan.”
Any of the diets (omnivore, vegetarian and vegan) can be made gluten-free.
Whatever you select will automatically update the ingredients and instructions!
The heart icon: clicking the heart icon will add recipes to your “favorites.” Ideally for things you’ve made before!
The bookmark icon: clicking the flag icon will add recipes to your “bookmarked.” Ideally for meals you want to make in the future!
The calendar icon: clicking the calendar will add the meal to your meal planner. It will go in the next available space in your planner. Clicking the icon a second time will take you to the meal planner.
Changing Serving Amounts
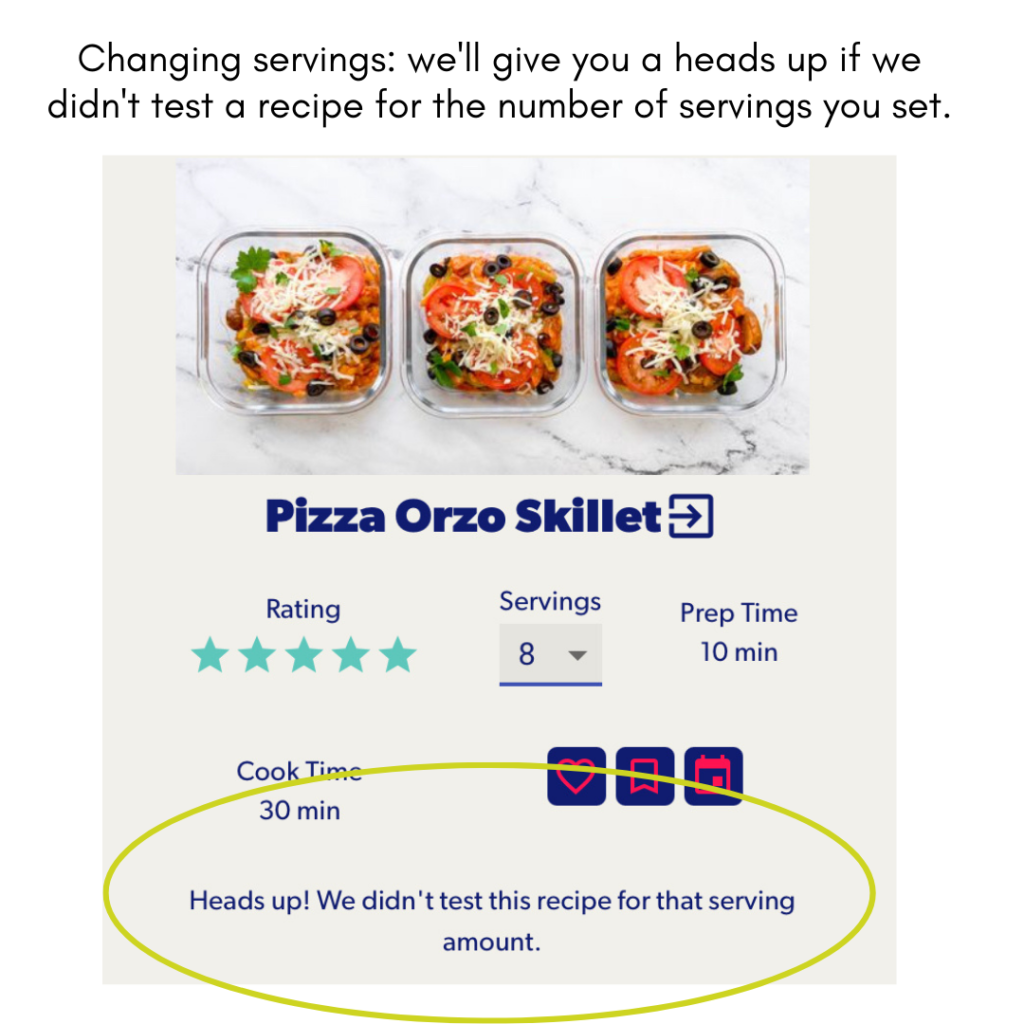
You can set the serving amount on recipes at any number between 1 and 12.
The recipe will automatically show the default serving amount, which is what it was written to make.
If you change the recipe to a serving amount that it wasn’t written for, you’ll get a little heads up.
No matter what change you make to the serving amount, the ingredients will update automatically.
Helpful serving amount tip: we’ve heard from members that our recipes that make “3 servings” are quite large and members are able to get 4-5 servings out of them. It comes down to how much you want to eat at mealtimes! We are big eaters here at WWL HQ.
Recipe Notes
Recipe notes, tips and reheating instructions are below the instructions and ingredients in recipes.
Our Weekly Meal Plan
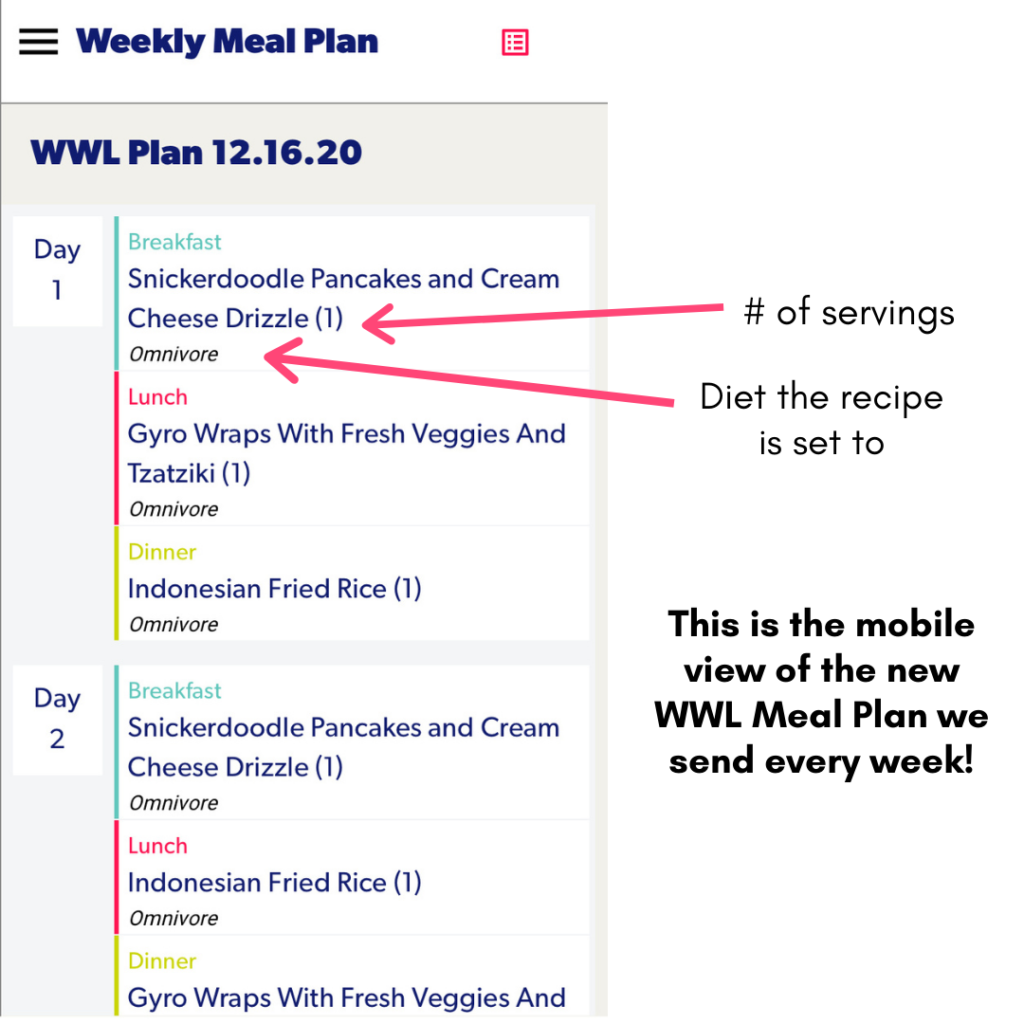
The Weekly Meal Plan tab is where you’ll find the plan that Workweek Lunch sends out every week. On this page, you can print, edit the plan or generate the grocery list.

If you scroll below the meal plan, you’ll find all our helpful swap notes and meal prep guide.
This page will update every week when the new WWL Meal Plan comes out!
How To Use The Meal Planner
Ready for some fun? On this page, you can edit the meal plans we send out or make your own. Here’s how to do it.
IMPORTANT NOTES ABOUT THE MEAL PLANNER
You can have any number of servings of a meal on the grid.
Each meal on the grid represents one serving unless it’s stacked (then the number you see next to the title is the number of servings).
To remove a recipe, simply click the teal “x” on the top left of each meal.
Clicking “delete” on the bottom right of the meal plan will clear the entire thing.
Step 3: Save your meal plan
Click “save” on the bottom right of your meal plan.
You’ll be prompted to name and select the date your meal plan starts if you want to organize it that way.
You do not have to name your meal plan.
You have to save your meal plan to get the grocery list.
Once your plan is saved, it will look like this!
From this view, you can edit the plan, print it out or get your grocery list.
Editing and Saving the Grocery List
Once you’ve saved your meal plan, you can get the grocery list.
It looks like this!
On the top, you have the option to save (handy if you make edits), email it to yourself or print it out.
If you click “email” the default email application on your device will open and set up an email with the list inside. Note that this feature is not available on Mobile at the moment.
What you can do with this list:
- Use the checkboxes on the left of each ingredient to check them off. This is great to use when you’re shopping.
- Use the = on the right of the notes to move ingredients up or down on the list.
- Use the pencil icon to edit the item.
- Use the trash can icon to delete the item – great for removing things you already have at home!
You can also add ingredients to your list.
Scroll down a bit. Click “add ingredient” and type over the word “name” that pops up on the left. I wrote “grapes.”
Then click the floppy disk icon on the right to save the new ingredient.
Once you’re done editing your list, hit “save” at the top.
Your most recently saved list will always be accessible via the list icon at the top of the menu (see photo below). That way you can easily get it when you’re shopping!
My Meal Plans
This page is your meal plan hub. It’s where you can find all of your saved meal plans, as well as all the previous WWL Meal Plans.
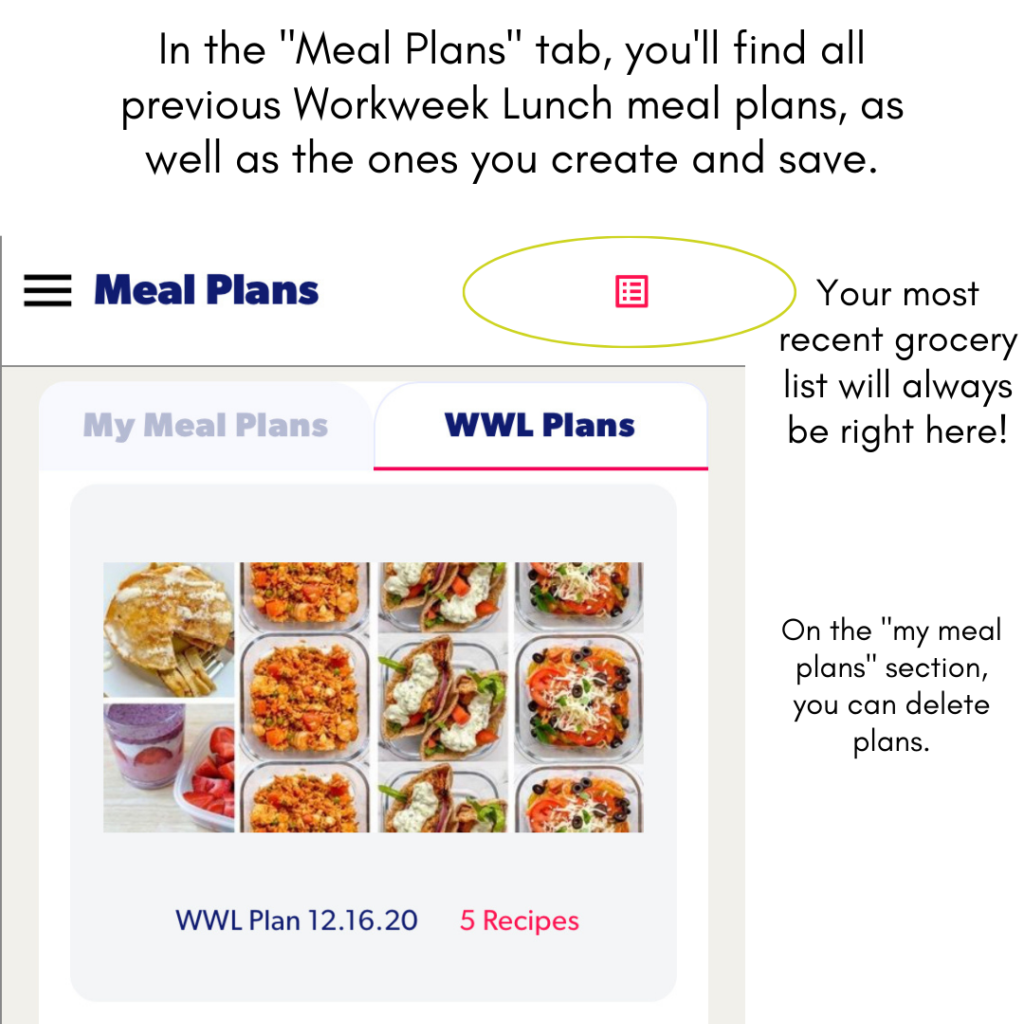
From here, you can delete meal plans you’ve made, view them and then edit them. You also have the option to add a new meal plan from this page.
“My Account:” What You Can Change
On this page, you can adjust your measurement preference for recipes, your primary diet, as well as the gluten-free and dairy-free settings.
You must hit “save” after making changes. After you hit save, a little pop up will let you know the changes were made!
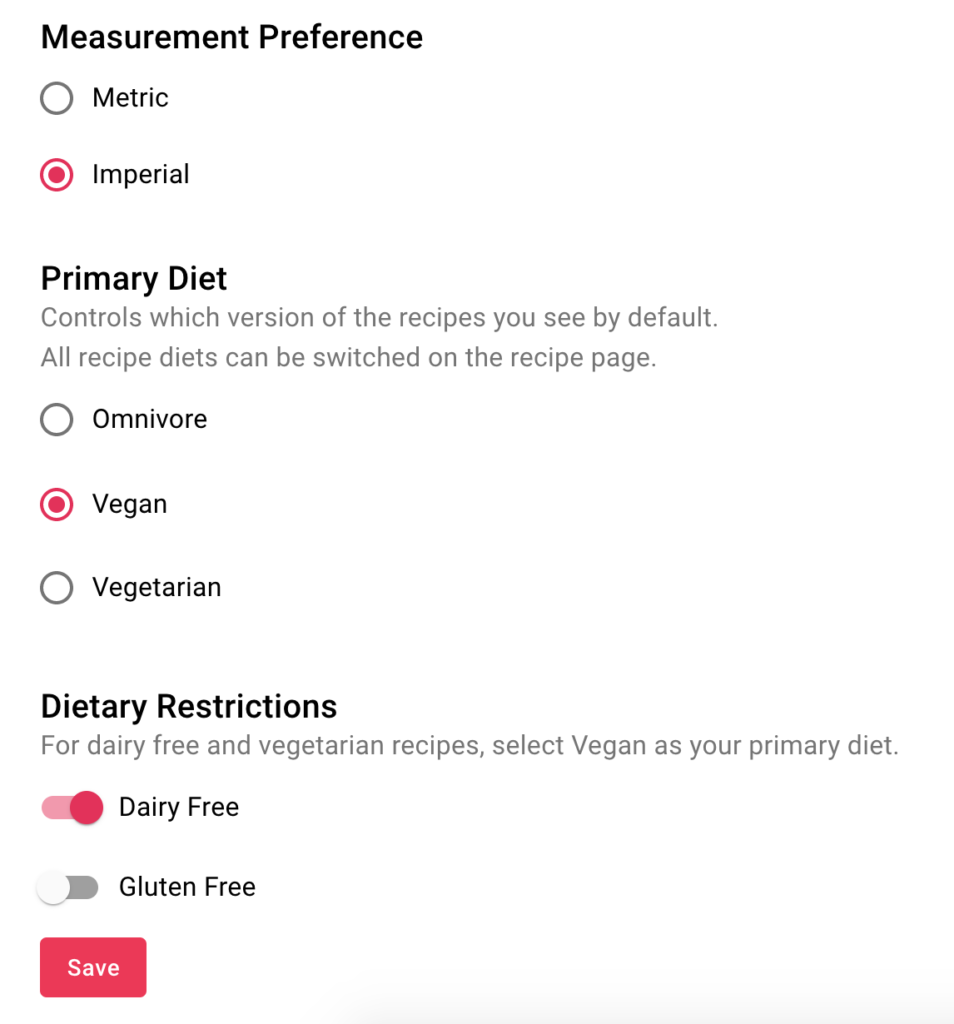
The “diary-free” setting is mainly for omnivores who are dairy-free.
Note that if you select “vegan,” the “dairy-free” toggle will also switch on.
If you select “vegetarian” and “dairy-free” your primary diet automatically gets set to “vegan.”
You can use the “gluten-free” setting for any primary diet.
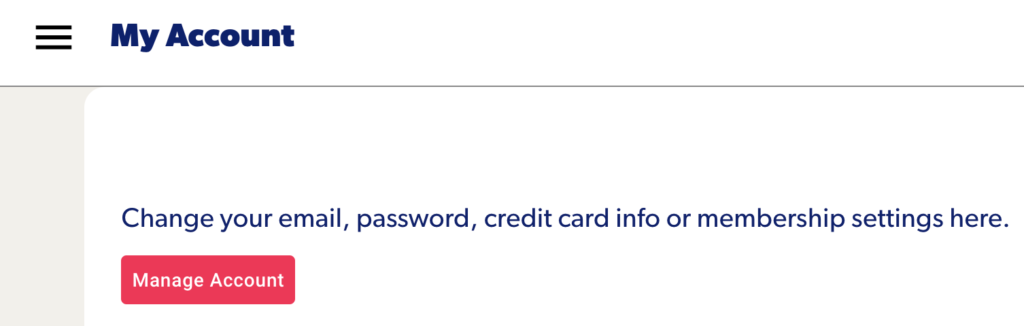
On this page, you can also manage your Workweek Lunch Membership.
Click the pink “manage account” button to change your password, change your email, update your credit card, upgrade your membership or cancel your membership.
More on managing your WWL account here!
Getting Help/Reporting Issues
If you run into a bug or something is broken on the site, you can submit a bug from the menu (top left of the site).
Click “Submit a bug report” to report a site issue.
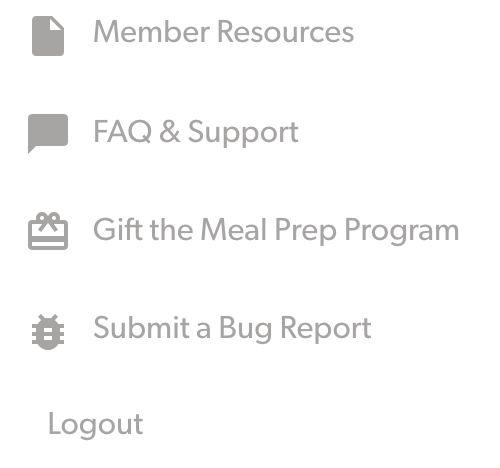
To reach our support team, click “FAQ & Support.
From there, you’ll find a link to a form to contact us directly.
If you still have questions after reading through this, please reach out!


Leave a Reply