If mac and cheese holds a special place in your heart, we have something in common.
Making this cheesy delight from scratch doesn’t have to be intimidating or difficult and that’s because it’s neither of those things. It might just seem that way, especially if you’ve grown up eating the kind that comes out of a box, which is pretty fast and easy.
Turns out, making mac and cheese from scratch is also easy and I can’t wait to share my foolproof method with you. It’s also something you can adapt it to your needs, and is a go-to meal prep for when I want something comforting and filling.
Get more recipes like this in the Workweek Lunch Meal Prep Program with access to our meal planning tools, grocery list generator, and more. Start a free trial today!
How to Make Creamy Mac and Cheese Sauce
The easiest way to make homemade cheese sauce for your mac is by starting with a roux, which is a base that consists of a combination of cooked flour and a fat, such as oil or butter. The roux helps the sauce to thicken. You make it by cooking the flour in the fat so that it’s no longer raw (no one wants to eat raw flour; it can make you sick). It takes about two or three minutes of focused effort. Don’t walk away or pick up your phone, because it might burn if you allow yourself to get distracted.
Here’s how to do it step-by-step:
- Melt butter in a saucepan over medium heat.
- Add flour and whisk constantly for 2–3 minutes until the raw flour smell disappears.
- Slowly pour in milk while whisking to prevent lumps.
- Keep the heat on medium-low and let the mixture bubble gently — not boil!
- Once thickened, stir in your shredded cheese, salt, pepper, and any seasonings you like.
You’ve just made a basic béchamel sauce — the classic base for mac and cheese.
💡 Pro tip: Always whisk (not stir) to keep your sauce smooth and creamy.
How to Troubleshoot Mac and Cheese Sauce
Even the best cooks need a few fix-it tricks:
- Too thick? Add a splash of milk or broth to loosen it up.
- Too thin? Let it cook a few more minutes over low heat to thicken.
- Grainy or curdled? Keep the heat low next time — cheese melts best gently.
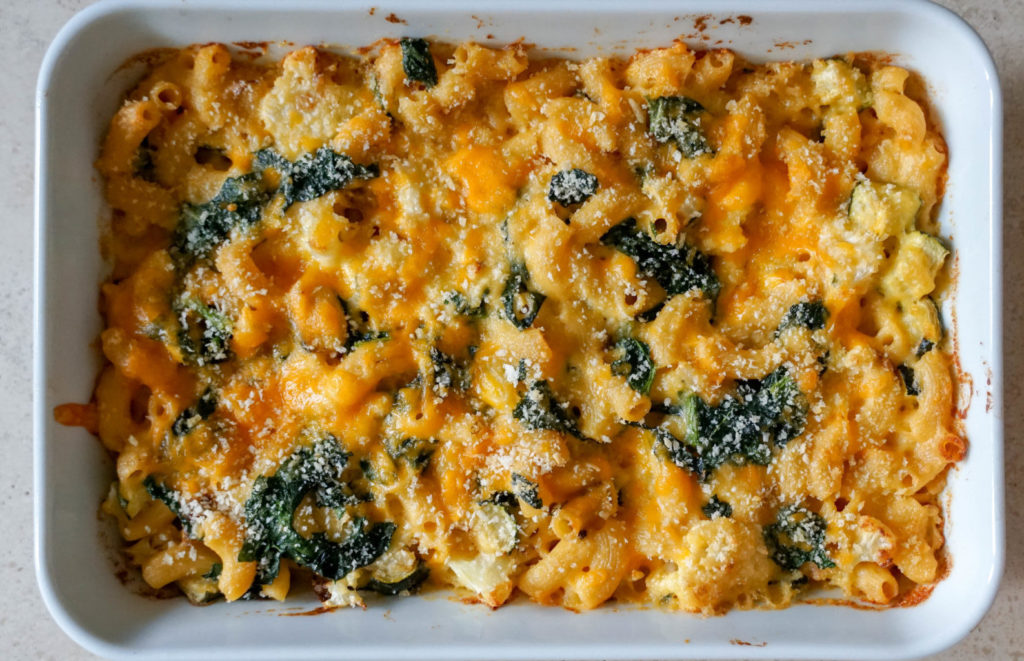
Once your sauce is silky and delicious, toss in your cooked pasta and serve right away. For baked mac and cheese lovers, transfer everything to a casserole dish, sprinkle with breadcrumbs, and bake until bubbly and golden brown.
We love a good stovetop mac and cheese; that’s the fastest way. Or combine it all in a casserole dish and bake it to get a crust on top, if you have time. And patience. (Recipe below).
What’s the Best Cheese for Mac and Cheese?
Cheddar is the classic, and for good reason! It melts very well and gives that familiar flavor everyone loves.
Other great options include:
- Gruyère – for a nutty, rich flavor
- Gouda or Monterey Jack – creamy and mild
- Mozzarella + Parmesan combo – stretchy and salty goodness
- Cream cheese – adds smoothness and tang
Avoid crumbly cheeses like feta — they won’t melt smoothly.
💡 Pro tip: Shred your own cheese if you can — pre-shredded versions often have anti-caking agents that affect melting.
How to Customize Mac and Cheese
Mac and cheese is a great base for all types of flavor profiles and ingredients. Make it once and then experiment to see what prefer, or vary it based on your mood or what you’ve got in the fridge or pantry. (That’s kind of our favorite way to go).
Here are some of the substitutions and customizations for mac and cheese:
Add-ins:
- Jalapeños or hot sauce for heat
- Roasted veggies (broccoli, squash, or bell peppers)
- Cooked spinach or mushrooms
- Crumbled bacon or ground turkey for a protein boost
- Roasted garlic or pesto for extra flavor
Flavor twists:
- Stir in a teaspoon of dried mustard or hot sauce for tang.
- Sprinkle breadcrumbs mixed with herbs on top before baking.
- Try a “pizza mac” with pepperoni and mozzarella.
Allergy-friendly swaps:
- Use gluten-free pasta and flour.
- Use plant-based milk and vegan cheese for a dairy-free version (just check that your milk isn’t sweetened or flavored).
👉 Your mac, your rules!

How to Serve Homemade Mac and Cheese
Some would argue that mac and cheese on its own is not a meal, but as I said before, you make the rules.
If you want to make this recipe as a side dish, you can pair it with a number of different mains. Here are three easy ideas.
You could make a classic BBQ plate with baked chicken wings (or cauliflower wings) and braised greens or roasted broccoli.
Or whip up a fresh side salad and your favorite pan-fried proteins!
When in doubt, throw your favorite vegetables on a sheet pan and roast them to go alongside.
In the WWL Program, all our recipes incorporate vegetables to make them a full meal so you don’t have to worry about sides! Click here to join on a free trial!
How to Store Mac and Cheese
This mac and cheese keeps well for up to 4 days in the fridge in airtight containers.
To reheat:
- Microwave or warm on the stovetop with a splash of water or milk to bring the sauce back to life.
Freezer tip:
- Freeze for up to 6 months.
- You can even double the batch — bake one now and freeze the other unbaked for a quick, future comfort meal.
When you’re ready to eat, bake it straight from frozen or after thawing overnight in the fridge.
Happy prepping!
FAQs
You can, but freshly shredded cheese melts smoother and makes your sauce creamier.
Stir in a little extra milk before baking and cover with foil for the first half of the bake time.
Definitely! Portion it out into individual containers for easy grab-and-go lunches. Add roasted veggies or protein for a balanced meal.
Elbows are classic, but shells, cavatappi, or rotini all hold sauce beautifully.
Yes! Use plant-based milk, vegan butter, and your favorite dairy-free cheese blend.
Love this recipe?
Join the Workweek Lunch Meal Prep Program for flexible meal plans, grocery list tools, and hundreds of comforting, prep-friendly recipes. Start your free trial today!
Other Mac and Cheese Recipes to try!
- Veggie Mac And Cheese With Cauliflower, Zucchini, And Bell Pepper
- Gruyere, Green Bean, and Mushroom Mac and Cheese
- Southern Mac and Cheese
- Stovetop Mac and Cheese
- Vegan Mac and Cheese
- Bacon Mac and Cheese
- Creamy Mac and Cheese with Sour Cream
More Comfort Foods We Love
- Chicken Pot Pie For Meal Prep
- Creamy Butternut Squash Curry over Rice
- Ground Beef, Orzo, and Zucchini Casserole
- Vegetarian Ramen With Tofu and Marinated Eggs
- Pumpkin Sage Pasta With Ground Turkey, Mushrooms & Kale
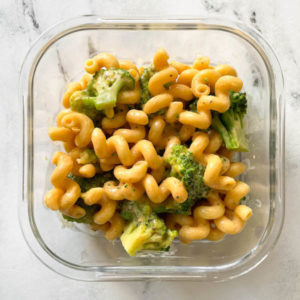
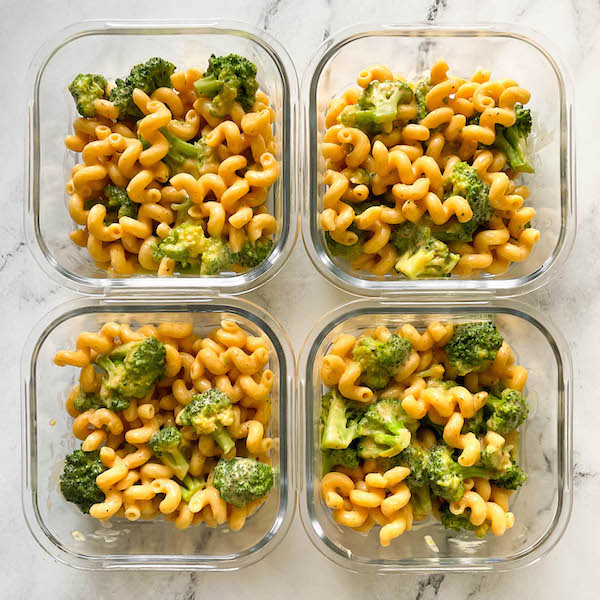
Mac and Cheese for Meal Prep
Ingredients
- cooking spray
- 8 oz short pasta such as penne, cavatappi, elbow macs, etc.
- 1 head broccoli chopped into florets, about 3 cups
- 2 tablespoons unsalted butter
- 2 tablespoons all-purpose flour
- 1 cup milk warm
- 2 cups shredded cheese your choice
- 1 tsp chipotle powder
- salt and pepper to taste
- 1/4 cup breadcrumbs optional
Instructions
- Preheat the oven to 400F / 200C and prepare a 9×9 baking dish with cooking spray.
- Bring a large pot of water to a boil, then add a big pinch of salt and the pasta. Cook according to the package directions, adding the broccoli to the pot 2-3 minutes before the pasta is al dente. Cook together; the broccoli should be bright green. Drain the pasta and broccoli and set aside.
- Melt the butter in a medium saucepan over medium-low heat. Add the flour and stir for 2-3 minutes, until combined. Add the milk, turn up the heat slightly, and whisk until no clumps remain and the mixture thickens. Add the cheese and stir until melted. Add the chipotle powder, salt, and pepper. Taste and adjust seasonings to your liking.
- Remove from the heat, then add the cooked pasta and broccoli to the cheese sauce. Stir until well combined.
- Pour the mac and cheese into the prepared baking dish and top with breadcrumbs. Bake for 15 minutes, uncovered, until the top is golden brown. Or feel free to skip this step and eat it right out of the pot, but we like the baked version's texture the best.
- If prepping this, allow it to cool slightly out of the oven. Then divide among meal prep containers. Allow to cool completely before storing in the refrigerator or freezer.


Liz Ferris says
Super easy and delicious recipe. This yielded 6 generous side portions for us when used in a meal-prep just FYI.